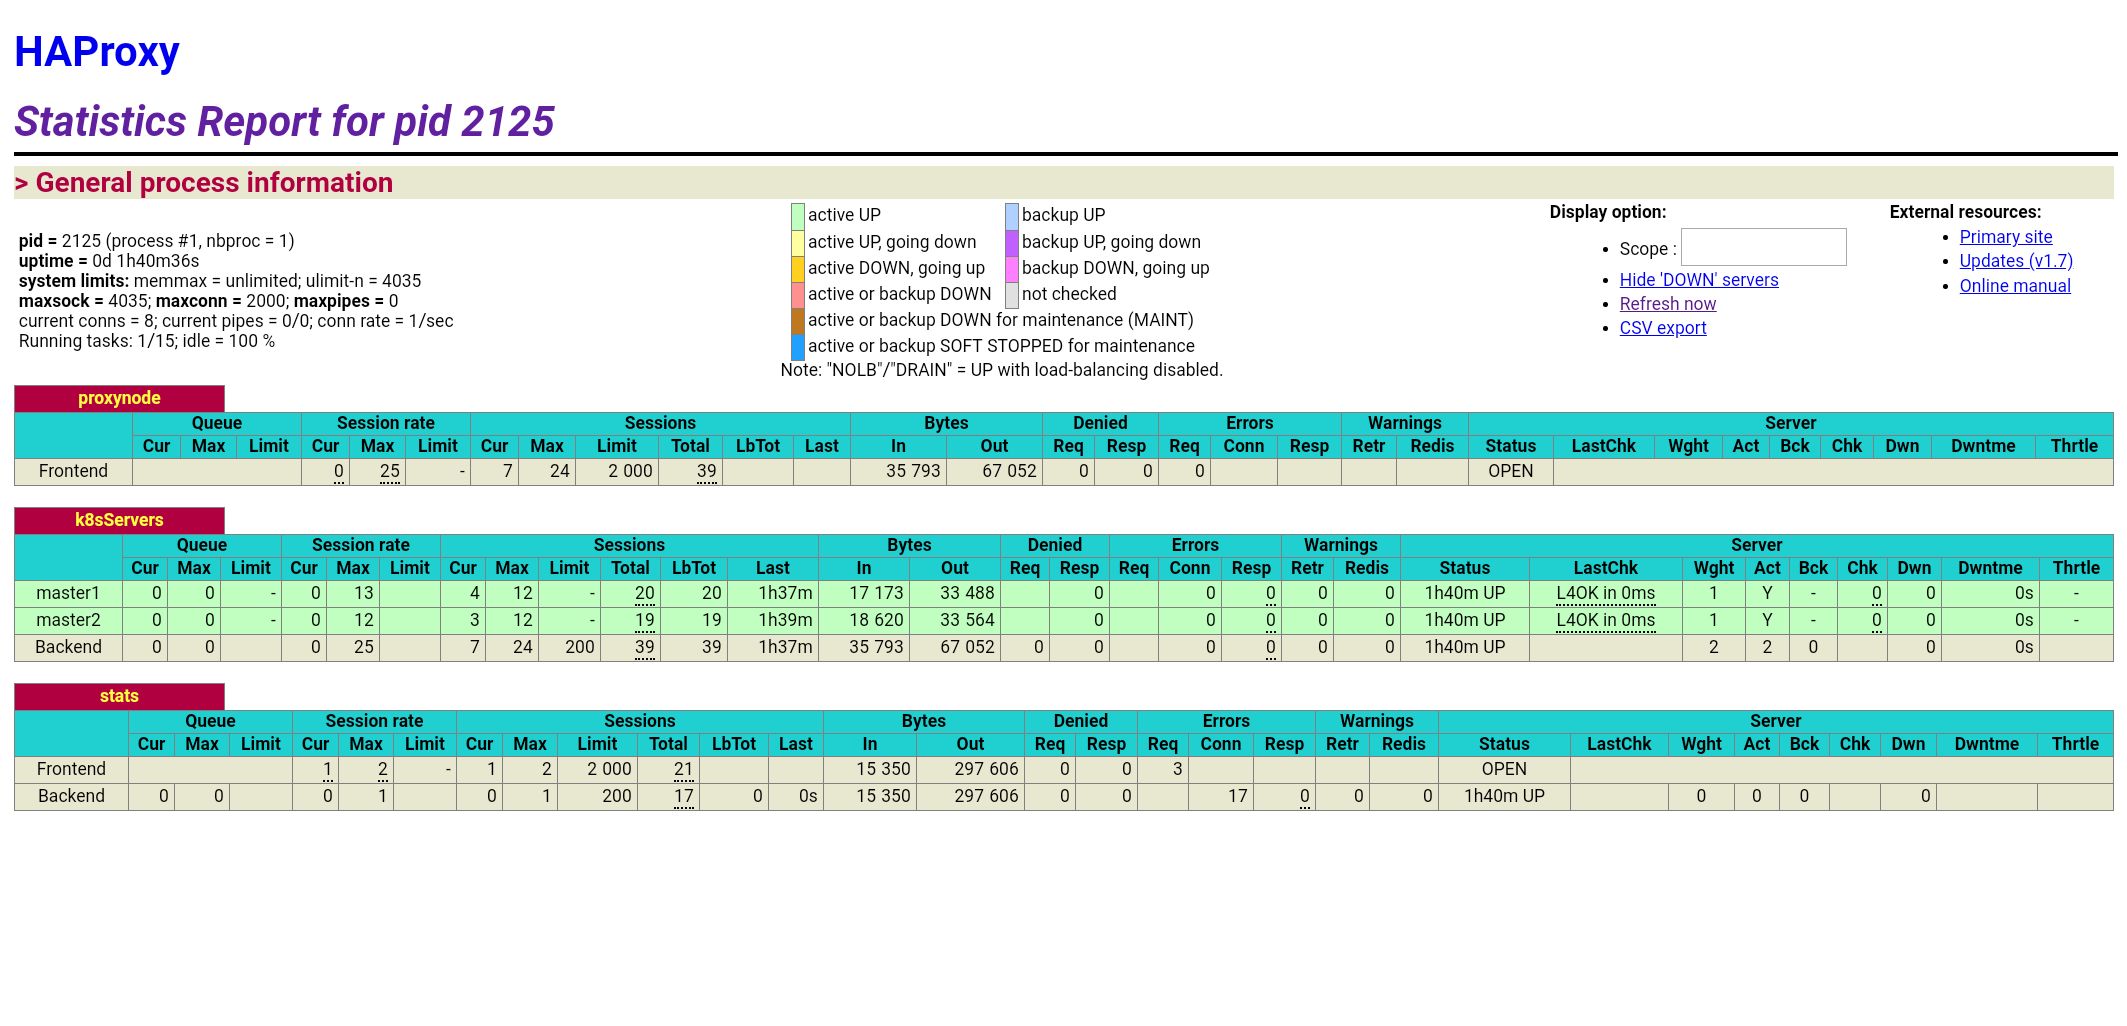
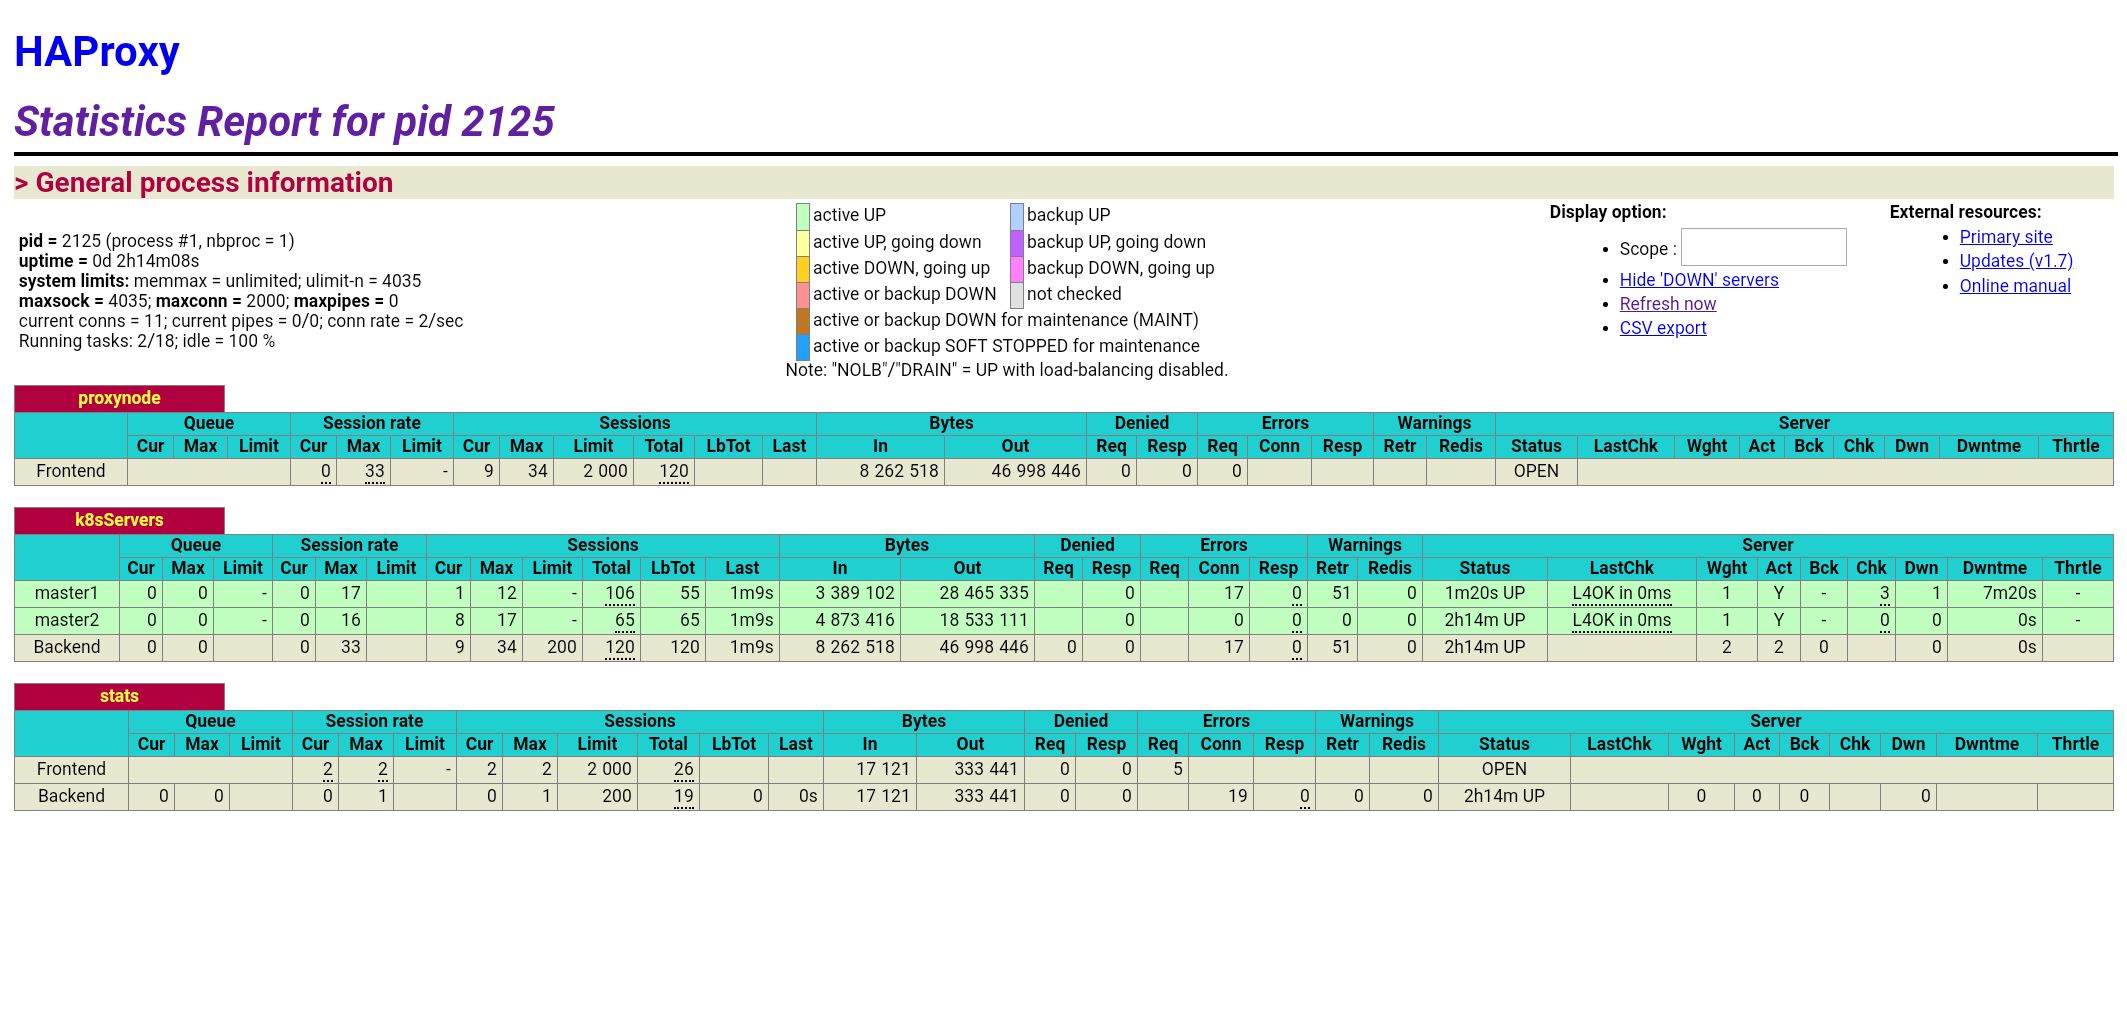
# master node 2대를 추가해 H.A 구성을 해보자.
[ 방법 ]
1. 트래픽을 받도록 load balancer로 배포한다. HAProxy는 배포가 쉬운편이다. start하여 현재 동작중인 master node를 확인한다.
2. k8smaster2,3번 노드에 kubernetes software를 설치한다. (이 과정은 기존 worker node를 이미지 떠서 만들면 더 편할 듯하다.)
3. k8smaster2번을 master node에 join 한다. 기존에 worker node 추가때 사용하던 kubeadm join 으로 부터 추가적으로 hash와 flag가 필요할 것이다.
4. k8smaster3번을 master node에 join 한다.
5. haproxy에 3개의 master를 사용하도록 설정을 수정하여 재시작한다.
6. 트래픽 및 모니터링 화면을 통해 제대로 분배되어 들어오는지 확인한다.
[ 준비사항 ]
- 3개의 노드 준비 (proxy node, k8smaster2, k8smaster3)
# haproxy, master2, master3 세팅
# 계정 추가 및 세팅
$ useradd -s /bin/bash -m ps0107

$ passwd ps0107

$ vi /etc/sudoers.d/ps0107
  ps0107 ALL=(ALL) ALL

$ chmod 440 /etc/sudoers.d/ps0107

$ vi /etc/sudoers
  %sudo   ALL=(ALL:ALL) NOPASSWD: ALL

$ vi /etc/ssh/sshd_config
  PasswordAuthentication yes

$ service ssh restart

$ vi /etc/hosts
10.146.0.2   k8smaster   master
10.146.0.13  k8smaster2  master2
10.146.0.14  k8smaster3  master3
10.146.0.4   k8sworker1  worker1

$ apt-get update && apt-get upgrade -y

#### master2,3번은 docker 및 kubernetes software 설치
$ apt-get install -y docker.io

$ vi /etc/apt/sources.list.d/kubernetes.list
  deb http://apt.kubernetes.io/ kubernetes-xenial main

$ curl -s https://packages.cloud.google.com/apt/doc/apt-key.gpg | apt-key add -

$ apt-get update

$ apt-get install -y kubeadm=1.15.1-00 kubelet=1.15.1-00 kubectl=1.15.1-00
# haproxy 설치
###################################
# haproxy 설치
###################################
# haproxy install
ps0107@proxy:~$ sudo apt-get update ; sudo apt-get install -y apache2 haproxy

# haproxy 설정 변경
ps0107@proxy:~$ sudo vi /etc/haproxy/haproxy.cfg
global
	log /dev/log	local0
	log /dev/log	local1 notice
	chroot /var/lib/haproxy
	stats socket /run/haproxy/admin.sock mode 660 level admin
	stats timeout 30s
	user haproxy
	group haproxy
	daemon

	# Default SSL material locations
	ca-base /etc/ssl/certs
	crt-base /etc/ssl/private

	# Default ciphers to use on SSL-enabled listening sockets.
	# For more information, see ciphers(1SSL). This list is from:
	#  https://hynek.me/articles/hardening-your-web-servers-ssl-ciphers/
	ssl-default-bind-ciphers ECDH+AESGCM:DH+AESGCM:ECDH+AES256:DH+AES256:ECDH+AES128:DH+AES:ECDH+3DES:DH+3DES:RSA+AESGCM:RSA+AES:RSA+3DES:!aNULL:!MD5:!DSS
	ssl-default-bind-options no-sslv3

defaults
	log	global
	mode	tcp
	option	tcplog
	option	dontlognull
        timeout connect 5000
        timeout client  50000
        timeout server  50000
	errorfile 400 /etc/haproxy/errors/400.http
	errorfile 403 /etc/haproxy/errors/403.http
	errorfile 408 /etc/haproxy/errors/408.http
	errorfile 500 /etc/haproxy/errors/500.http
	errorfile 502 /etc/haproxy/errors/502.http
	errorfile 503 /etc/haproxy/errors/503.http
	errorfile 504 /etc/haproxy/errors/504.http

frontend proxynode
   bind *:80
   bind *:6443
   stats uri /proxystats
   default_backend k8sServers

backend k8sServers
   balance roundrobin
   server master1  10.146.0.2:6443 check
#  server master2  10.128.0.30:6443 check
#  server master3  10.128.0.66:6443 check

listen stats
     bind :9999
     mode http
     stats enable
     stats hide-version
     stats uri /stats

# 설정 변경 후 재시작
ps0107@proxy:~$ sudo service haproxy restart

# 재시작 및 상태 확인
ps0107@proxy:~$ sudo service haproxy status
● haproxy.service - HAProxy Load Balancer
   Loaded: loaded (/lib/systemd/system/haproxy.service; enabled; vendor preset: enabled)
   Active: active (running) since Tue 2020-02-18 06:02:59 UTC; 9s ago
     Docs: man:haproxy(1)
           file:/usr/share/doc/haproxy/configuration.txt.gz
  Process: 4116 ExecStartPre=/usr/sbin/haproxy -f $CONFIG -c -q $EXTRAOPTS (code=exited, status=0/SUCCESS)
Main PID: 4118 (haproxy-systemd)
    Tasks: 3 (limit: 4915)
   CGroup: /system.slice/haproxy.service
           ├─4118 /usr/sbin/haproxy-systemd-wrapper -f /etc/haproxy/haproxy.cfg -p /run/haproxy.pid
           ├─4121 /usr/sbin/haproxy-master
           └─4122 /usr/sbin/haproxy -f /etc/haproxy/haproxy.cfg -p /run/haproxy.pid -Ds

Feb 18 06:02:59 proxy systemd[1]: Starting HAProxy Load Balancer...
Feb 18 06:02:59 proxy systemd[1]: Started HAProxy Load Balancer.
Feb 18 06:02:59 proxy haproxy-systemd-wrapper[4118]: haproxy-systemd-wrapper: executing /usr/sbin/haproxy -f /etc/haproxy/haproxy.cfg -p /run/haproxy.pid -Ds
Feb 18 06:02:59 proxy haproxy[4121]: Proxy proxynode started.
Feb 18 06:02:59 proxy haproxy[4121]: Proxy proxynode started.
Feb 18 06:02:59 proxy haproxy[4121]: Proxy k8sServers started.
Feb 18 06:02:59 proxy haproxy[4121]: Proxy k8sServers started.
# haproxy 동작 확인 (현재는 master1번만 backend)
# 이제 master1의 hosts파일을 수정하여 k8smaster가 haproxy 로 가도록 아이피를 수정해준다.
# haproxy 에서 현재 설정된대로 master1번 으로 호출하게 될것이다.

# hosts파일 수정
ps0107@k8smaster1:~/.ssh$ cat /etc/hosts
127.0.0.1 localhost
#10.146.0.2  k8smaster  master
10.146.0.9  k8smaster   master

# haproxy stats 웹페이지 접속
http://35.243.70.115:9999/stats

# kubectl 명령을 여러번 호출 한 후 웹페이지를 확인해 본다.
ps0107@k8smaster1:~/lab/LFS458/SOLUTIONS/s_16$ kubectl get node
NAME         STATUS   ROLES    AGE   VERSION
k8smaster1   Ready    master   21d   v1.15.1
k8sworker1   Ready    <none>   21d   v1.15.1
http://35.243.70.115:9999/stats

# master 1번 노드에서 token 과 SSL hash 생성
###############################################
# master 1번 노드에서 token 과 SSL hash 생성
###############################################
# 조인을 위해 master1번서버에서 token들과 hash

# master1번 아이피를 haproxy 서버 아이피로 변경한다
ps0107@k8smaster2:~$ sudo vi /etc/hosts

# master1번 서버에서 token 생성
ps0107@k8smaster1:~$ sudo kubeadm token create
nmub4r.x6pnwhwicqosxtbn

# SSL hash 생성
ps0107@k8smaster1:~$ openssl x509 -pubkey \
> -in /etc/kubernetes/pki/ca.crt | openssl rsa \
> -pubin -outform der 2>/dev/null | openssl dgst \
> -sha256 -hex | sed 's/^.* //'
16e1304347fa2f5cb6f1660e582ed3501aa63e0ddce276773566098aef13d0ba

# worker node가 아니라 master node로 join 하기 위해 신규 master certificate를 생성한다.
ps0107@k8smaster1:~$ sudo kubeadm init phase upload-certs --upload-certs
I0219 01:57:13.393987    9787 version.go:248] remote version is much newer: v1.17.3; falling back to: stable-1.15
[upload-certs] Storing the certificates in Secret "kubeadm-certs" in the "kube-system" Namespace
[upload-certs] Using certificate key:
d3bc0cd2c943fafe26e0dc5903ae41669993b7cbfbb7c4b5cc6336bb99a2e365
# master 2번 노드에서 master로 클러스터 조인 수행
###############################################
# master 2번 노드에서 master로 클러스터 조인 수행
###############################################
# master2번 노드에서 join 수행
ps0107@k8smaster2:~$ sudo kubeadm join k8smaster:6443 ₩
> --token nmub4r.x6pnwhwicqosxtbn ₩
> --discovery-token-ca-cert-hash sha256:16e1304347fa2f5cb6f1660e582ed3501aa63e0ddce276773566098aef13d0ba ₩
> --control-plane --certificate-key d3bc0cd2c943fafe26e0dc5903ae41669993b7cbfbb7c4b5cc6336bb99a2e365

[preflight] Running pre-flight checks
[WARNING IsDockerSystemdCheck]: detected "cgroupfs" as the Docker cgroup driver. The recommended driver is "systemd". Please follow the guide at https://kubernetes.io/docs/setup/cri/
[preflight] Reading configuration from the cluster...
[preflight] FYI: You can look at this config file with 'kubectl -n kube-system get cm kubeadm-config -oyaml'
[preflight] Running pre-flight checks before initializing the new control plane instance
[preflight] Pulling images required for setting up a Kubernetes cluster
[preflight] This might take a minute or two, depending on the speed of your internet connection
[preflight] You can also perform this action in beforehand using 'kubeadm config images pull'
[download-certs] Downloading the certificates in Secret "kubeadm-certs" in the "kube-system" Namespace
[certs] Using certificateDir folder "/etc/kubernetes/pki"
[certs] Generating "etcd/healthcheck-client" certificate and key
[certs] Generating "etcd/server" certificate and key
[certs] etcd/server serving cert is signed for DNS names [k8smaster2 localhost] and IPs [10.146.0.13 127.0.0.1 ::1]
[certs] Generating "apiserver-etcd-client" certificate and key
[certs] Generating "etcd/peer" certificate and key
[certs] etcd/peer serving cert is signed for DNS names [k8smaster2 localhost] and IPs [10.146.0.13 127.0.0.1 ::1]
[certs] Generating "apiserver-kubelet-client" certificate and key
[certs] Generating "apiserver" certificate and key
[certs] apiserver serving cert is signed for DNS names [k8smaster2 kubernetes kubernetes.default kubernetes.default.svc kubernetes.default.svc.cluster.local k8smaster] and IPs [10.96.0.1 10.146.0.13]
[certs] Generating "front-proxy-client" certificate and key
[certs] Valid certificates and keys now exist in "/etc/kubernetes/pki"
[certs] Using the existing "sa" key
[kubeconfig] Generating kubeconfig files
[kubeconfig] Using kubeconfig folder "/etc/kubernetes"
[kubeconfig] Writing "admin.conf" kubeconfig file
[kubeconfig] Writing "controller-manager.conf" kubeconfig file
[kubeconfig] Writing "scheduler.conf" kubeconfig file
[control-plane] Using manifest folder "/etc/kubernetes/manifests"
[control-plane] Creating static Pod manifest for "kube-apiserver"
[control-plane] Creating static Pod manifest for "kube-controller-manager"
[control-plane] Creating static Pod manifest for "kube-scheduler"
[check-etcd] Checking that the etcd cluster is healthy
[kubelet-start] Downloading configuration for the kubelet from the "kubelet-config-1.15" ConfigMap in the kube-system namespace
[kubelet-start] Writing kubelet configuration to file "/var/lib/kubelet/config.yaml"
[kubelet-start] Writing kubelet environment file with flags to file "/var/lib/kubelet/kubeadm-flags.env"
[kubelet-start] Activating the kubelet service
[kubelet-start] Waiting for the kubelet to perform the TLS Bootstrap...
[etcd] Announced new etcd member joining to the existing etcd cluster
[etcd] Wrote Static Pod manifest for a local etcd member to "/etc/kubernetes/manifests/etcd.yaml"
[etcd] Waiting for the new etcd member to join the cluster. This can take up to 40s
[upload-config] Storing the configuration used in ConfigMap "kubeadm-config" in the "kube-system" Namespace
[mark-control-plane] Marking the node k8smaster2 as control-plane by adding the label "node-role.kubernetes.io/master=''"
[mark-control-plane] Marking the node k8smaster2 as control-plane by adding the taints [node-role.kubernetes.io/master:NoSchedule]

This node has joined the cluster and a new control plane instance was created:

* Certificate signing request was sent to apiserver and approval was received.
* The Kubelet was informed of the new secure connection details.
* Control plane (master) label and taint were applied to the new node.
* The Kubernetes control plane instances scaled up.
* A new etcd member was added to the local/stacked etcd cluster.

To start administering your cluster from this node, you need to run the following as a regular user:

mkdir -p $HOME/.kube
sudo cp -i /etc/kubernetes/admin.conf $HOME/.kube/config
sudo chown $(id -u):$(id -g) $HOME/.kube/config

Run 'kubectl get nodes' to see this node join the cluster.

# config file 복사
ps0107@k8smaster2:~$ mkdir -p $HOME/.kube
ps0107@k8smaster2:~$ sudo cp -i /etc/kubernetes/admin.conf $HOME/.kube/config
ps0107@k8smaster2:~$ sudo chown $(id -u):$(id -g) $HOME/.kube/config

# master 1번에서 node 리스트를 확인해보자.
# 정상적으로 2번 마스트노드가 조인된걸 확인할수 있다. 3번도 같은 방법으로 수행한다.
ps0107@k8smaster1:~$ kubectl get nodes
NAME         STATUS   ROLES    AGE     VERSION
k8smaster1   Ready    master   21d     v1.15.1
k8smaster2   Ready    master   4m15s   v1.15.1
k8sworker1   Ready    <none>   21d     v1.15.1

# etcd pod도 조회해본다.
ps0107@k8smaster1:~$ kubectl -n kube-system get pods | grep etcd
etcd-k8smaster1                      1/1     Running   0          21d
etcd-k8smaster2                      1/1     Running   0          117m

# 새로 생긴 etcd pod의 로그를 확인해 본다.
ps0107@k8smaster1:~$ kubectl -n kube-system logs -f etcd-k8smaster2
......
2020-02-19 03:28:08.167787 I | etcdserver: start to snapshot (applied: 2930857, lastsnap: 2920856)
2020-02-19 03:28:08.173395 I | etcdserver: saved snapshot at index 2930857
2020-02-19 03:28:08.174123 I | etcdserver: compacted raft log at 2925857
2020-02-19 03:30:02.972421 I | mvcc: store.index: compact 2528020
2020-02-19 03:30:02.973830 I | mvcc: finished scheduled compaction at 2528020 (took 1.034404ms)

# etcd pod에 들어가서 cluster status를 체크해보자.
ps0107@k8smaster1:~$ kubectl -n kube-system  exec -it etcd-k8smaster1 -- /bin/sh

# 아래 명령으로 조회해 본다.
# master1 etcd 가 리더로 설정되어 있다.
ETCDCTL_API=3 etcdctl -w table ₩
--endpoints 10.146.0.2:2379,10.146.0.13:2379 ₩
--cacert /etc/kubernetes/pki/etcd/ca.crt ₩
--cert /etc/kubernetes/pki/etcd/server.crt ₩
--key /etc/kubernetes/pki/etcd/server.key ₩
endpoint status

+------------------+------------------+---------+---------+-----------+-----------+------------+
|     ENDPOINT     |        ID        | VERSION | DB SIZE | IS LEADER | RAFT TERM | RAFT INDEX |
+------------------+------------------+---------+---------+-----------+-----------+------------+
|  10.146.0.2:2379 | 7a2c7e572714edd4 |  3.3.10 |  5.3 MB |      true |         6 |    2936615 |
| 10.146.0.13:2379 | fb2d7152d16646c3 |  3.3.10 |  5.3 MB |     false |         6 |    2936615 |
+------------------+------------------+---------+---------+-----------+-----------+------------+
### 윽.. gcp 사용중인데 한 리즌에 cpu 리밋이 8개라 더이상 인스턴스 생성이 불가하네요~
### 일단 그냥 한대 master 붙인걸로 테스트 해봐야겠네요.
http://35.243.70.115:9999/stats 접속하여 정상 적으로 분배되어 들어가는지 확인한다.

# FailOver 테스트 해보자.
###############################################
# FailOver 테스트 해보자.
###############################################

# master 1번 서버에서 docker service를 내려보자.
ps0107@k8smaster1:~$ sudo service docker stop

# etcd 로그를 확인해보자.
# master1번 etcd 에 대한 connection을 잃었다.
ps0107@k8smaster1:~$ kubectl -n kube-system logs -f etcd-k8smaster2
.....
2020-02-19 04:20:17.075534 I | raft: fb2d7152d16646c3 became leader at term 7
2020-02-19 04:20:17.075554 I | raft: raft.node: fb2d7152d16646c3 elected leader fb2d7152d16646c3 at term 7
2020-02-19 04:20:17.170081 W | rafthttp: lost the TCP streaming connection with peer 7a2c7e572714edd4 (stream Message reader)
2020-02-19 04:20:17.170267 W | rafthttp: lost the TCP streaming connection with peer 7a2c7e572714edd4 (stream MsgApp v2 reader)
2020-02-19 04:20:17.192833 E | rafthttp: failed to dial 7a2c7e572714edd4 on stream Message (EOF)
2020-02-19 04:20:17.192864 I | rafthttp: peer 7a2c7e572714edd4 became inactive (message send to peer failed)
2020-02-19 04:20:17.454474 W | rafthttp: lost the TCP streaming connection with peer 7a2c7e572714edd4 (stream Message writer)
2020-02-19 04:20:19.054260 W | raft: fb2d7152d16646c3 stepped down to follower since quorum is not active

# kubectl 명령은 잘 수행된다.
# master1번이 not ready 상태로 변경되었다.
ps0107@k8smaster1:~$ kubectl get nodes
NAME         STATUS     ROLES    AGE    VERSION
k8smaster1   NotReady   master   21d    v1.15.1
k8smaster2   Ready      master   138m   v1.15.1
k8sworker1   NotReady   <none>   21d    v1.15.1

# etcd를 접속해 cluster 상태를 확인해본다.
# 리더가 master2 etcd로 변경되었다.
ps0107@k8smaster1:~$ kubectl -n kube-system  exec -it etcd-k8smaster2 -- /bin/sh

ETCDCTL_API=3 etcdctl -w table ₩
--endpoints 10.146.0.2:2379,10.146.0.13:2379 ₩
--cacert /etc/kubernetes/pki/etcd/ca.crt ₩
--cert /etc/kubernetes/pki/etcd/server.crt ₩
--key /etc/kubernetes/pki/etcd/server.key ₩
endpoint status

+------------------+------------------+---------+---------+-----------+-----------+------------+
|     ENDPOINT     |        ID        | VERSION | DB SIZE | IS LEADER | RAFT TERM | RAFT INDEX |
+------------------+------------------+---------+---------+-----------+-----------+------------+
|  10.146.0.2:2379 | 7a2c7e572714edd4 |  3.3.10 |  5.3 MB |     false |        10 |    2937708 |
| 10.146.0.13:2379 | fb2d7152d16646c3 |  3.3.10 |  5.3 MB |      true |        10 |    2937708 |
+------------------+------------------+---------+---------+-----------+-----------+------------+
http://35.243.70.115:9999/stats 접속하여 노드 상태를 확인할 수 있다.

# 이제 다시 master1번 노드를 정상화 하여 본다.
# 이제 다시 master1번 서버의 docker service를 시작해 보자.
ps0107@k8smaster1:~$ sudo service docker start

# 정상적으로 Ready 상태로 변경되었다.
ps0107@k8smaster1:~$ kubectl get node
NAME         STATUS   ROLES    AGE    VERSION
k8smaster1   Ready    master   21d    v1.15.1
k8smaster2   Ready    master   142m   v1.15.1
k8sworker1   Ready    <none>   21d    v1.15.1

http://35.243.70.115:9999/stats 접속하여 노드 상태를 확인할 수 있다.

# etcd 로그르 확인해보자.
# master1번 etcd가 active 되었음을 확인할 수 있다.
ps0107@k8smaster1:~$ kubectl -n kube-system logs -f etcd-k8smaster2
.....
2020-02-19 04:27:41.728243 I | rafthttp: peer 7a2c7e572714edd4 became active
2020-02-19 04:27:41.728282 I | rafthttp: established a TCP streaming connection with peer 7a2c7e572714edd4 (stream MsgApp v2 reader)
2020-02-19 04:27:41.729772 I | rafthttp: established a TCP streaming connection with peer 7a2c7e572714edd4 (stream Message reader)
2020-02-19 04:27:41.741347 W | rafthttp: closed an existing TCP streaming connection with peer 7a2c7e572714edd4 (stream MsgApp v2 writer)
.....
http://35.243.70.115:9999/stats 접속하여 노드 상태를 확인할 수 있다.


